
Extend, Edit, Regenerate: Complete Image-to-Video Workflow in Dreamina
Creating a still image turns into a refined video; it is more than simply adding movement. You need to prepare, generate, review, revise, and export for effective results. Dreamina AI combines these phases by offering features like prompt editing, footage regeneration, segment editing, sequence extension, and resolution enhancement. There are different creative needs to be addressed with each control. A structured workflow helps to identify issues, prevent unnecessary edits, and prepare videos for their platform.
Prepare the Source Image and Define the Intended Outcome
Always begin with a clear image that sets up the subject matter, composition, and visual focus. Choose whether the scene requires subject movement, environmental activity, camera movement, or a combination of all these. Look for salient features such as facial expressions, clothing, shapes of products, product textures, lighting, etc. Decide on the length and the ratio of the footage to be shot beforehand. A successful result could be a product that has some finish, a character that has a gesture completed, or a landscape image that has depth. Having clear objectives helps provide a framework to evaluate the created video.
Understand the Main Controls in Dreamina’s Image-to-Video Workflow
Dreamina AI structures the Image to Video creation around generation and refinement controls that tackle various production issues. Knowing what they are for will help make sure they don’t regenerate needlessly, and that useful footage is maintained where possible.

| Workflow control | Main purpose | When to use it |
| Prompt editing | Clarify creative instructions | Movement or style seems misunderstood. |
| Regenerate | Create another version | The overall result misses the brief. |
| Edit video | Access available editing tools | Further adjustments are necessary. |
| Edit segment | Target a specific portion | One section needs correction. |
| Extend video | Continue an existing sequence | The scene needs additional duration. |
| Creative upscale | Enhance resolution | Clearer presentation is required. |
Exact controls and availability can vary with Dreamina’s interface, selected model, and account access.
Steps to Extend, Edit, Regenerate: Complete Image to Video Workflow in Dreamina
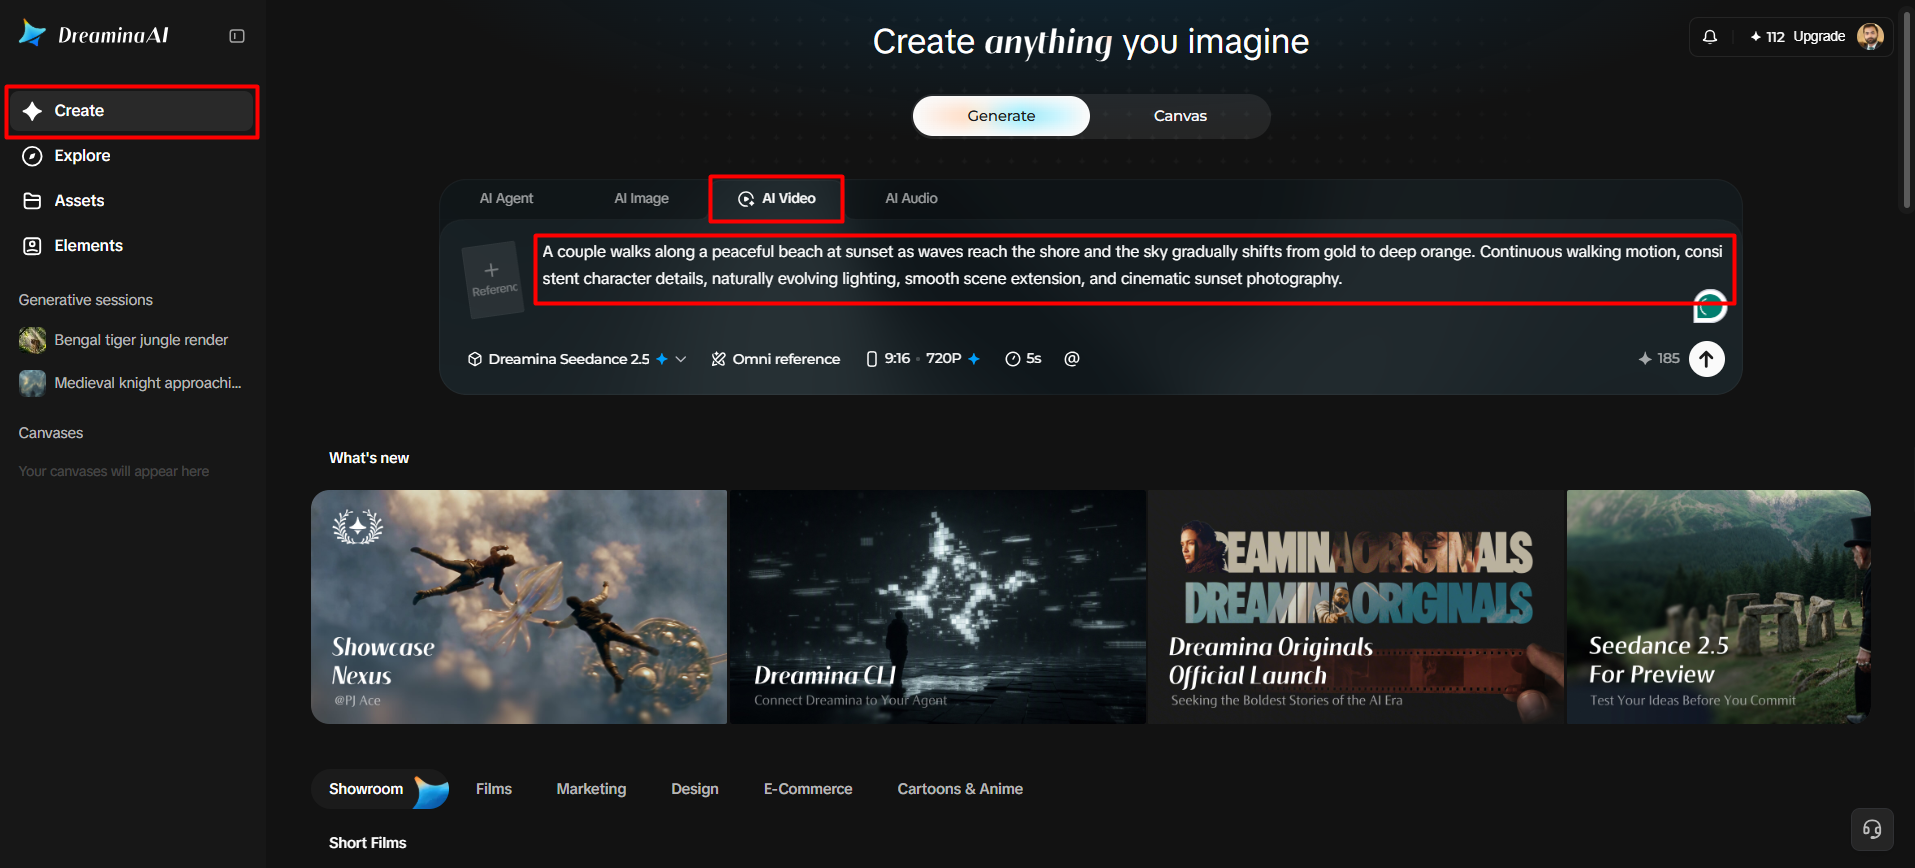
Step 1: Upload your image and define the video direction
- First, sign up or log in to Dreamina to access its complete image-to-video creation workflow.
- Next, navigate to the “Create” tab from the left menu and select “AI video”.
- Then, enter a detailed text prompt explaining your video’s elements, theme, concept, and intended visual direction.
Step 2: Select your model and generate the first version
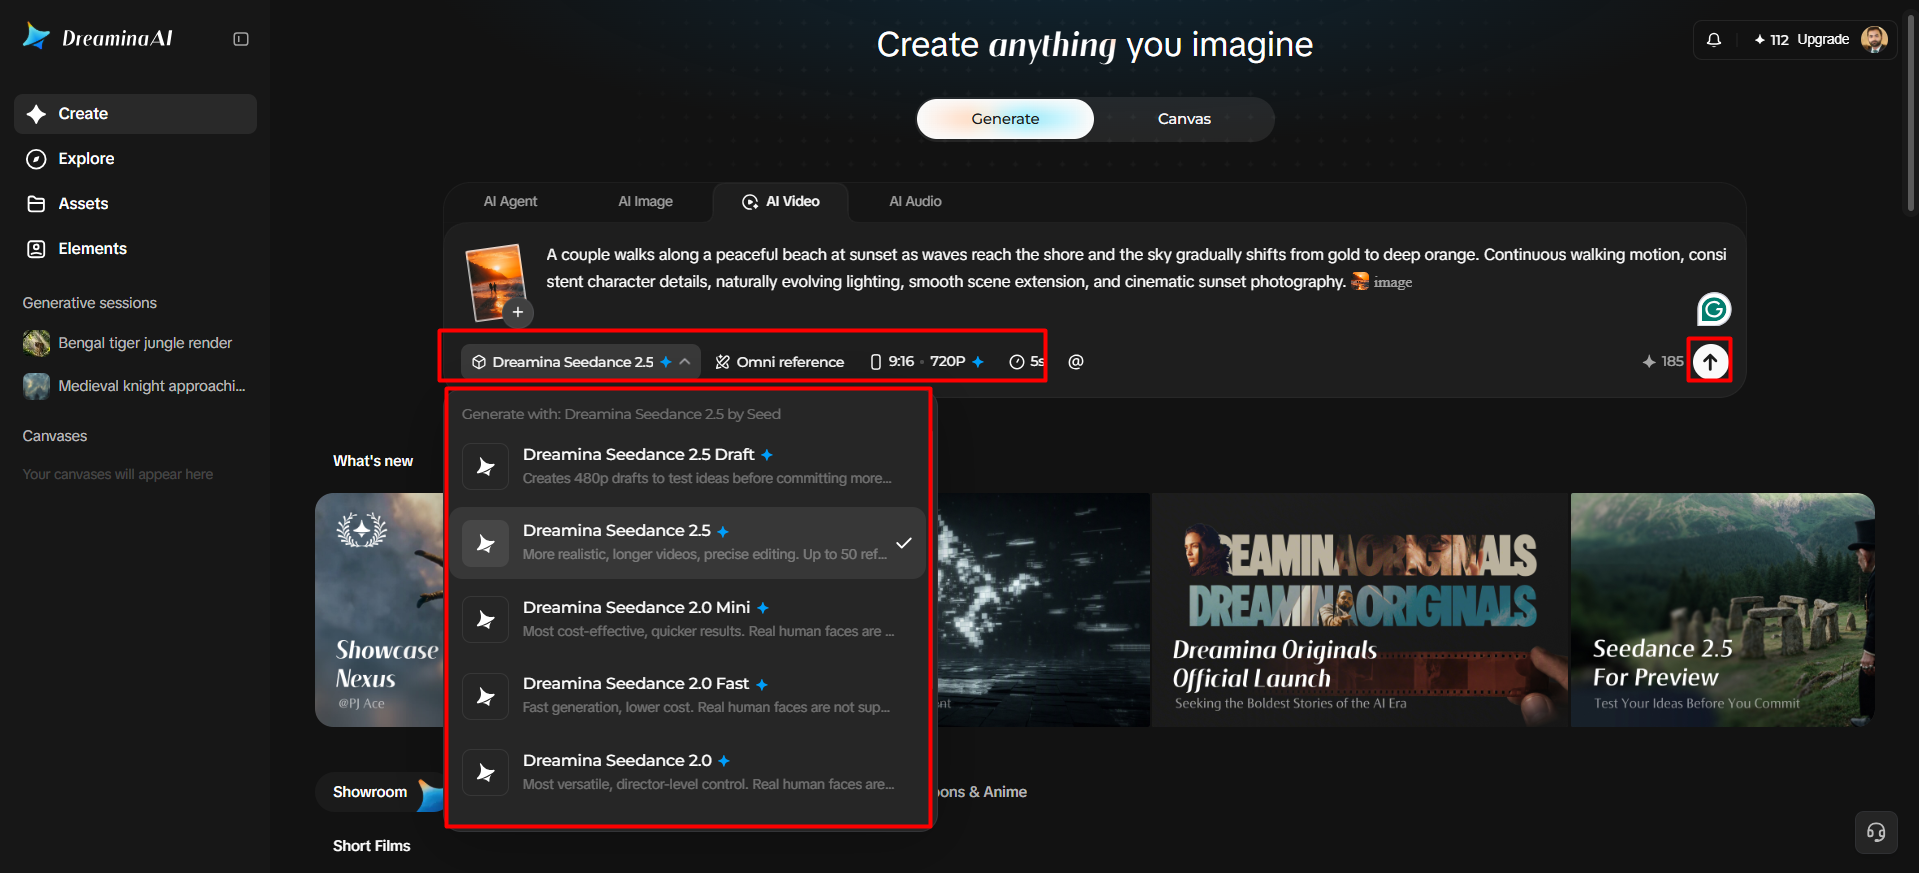
- Choose a suitable model from the options available at the bottom of the dialogue box.
- You can select Dreamina Seedance 2.5, Dreamina Seedance 2.0, Dreamina Seedance 2.0 Fast, Dreamina Seedance 2.0 Mini, Dreamina Seedance 1.0, and other available models.
- Click “Omni reference” to guide the AI with multiple reference images for more accurate video generation.
- Configure your desired dimensions and output quality using the “Aspect ratio” and “Resolution” tabs.
- Finally, click “Generate” to create the initial video and review the generated footage before editing.
Step 3: Edit, extend, upscale, and download your final video
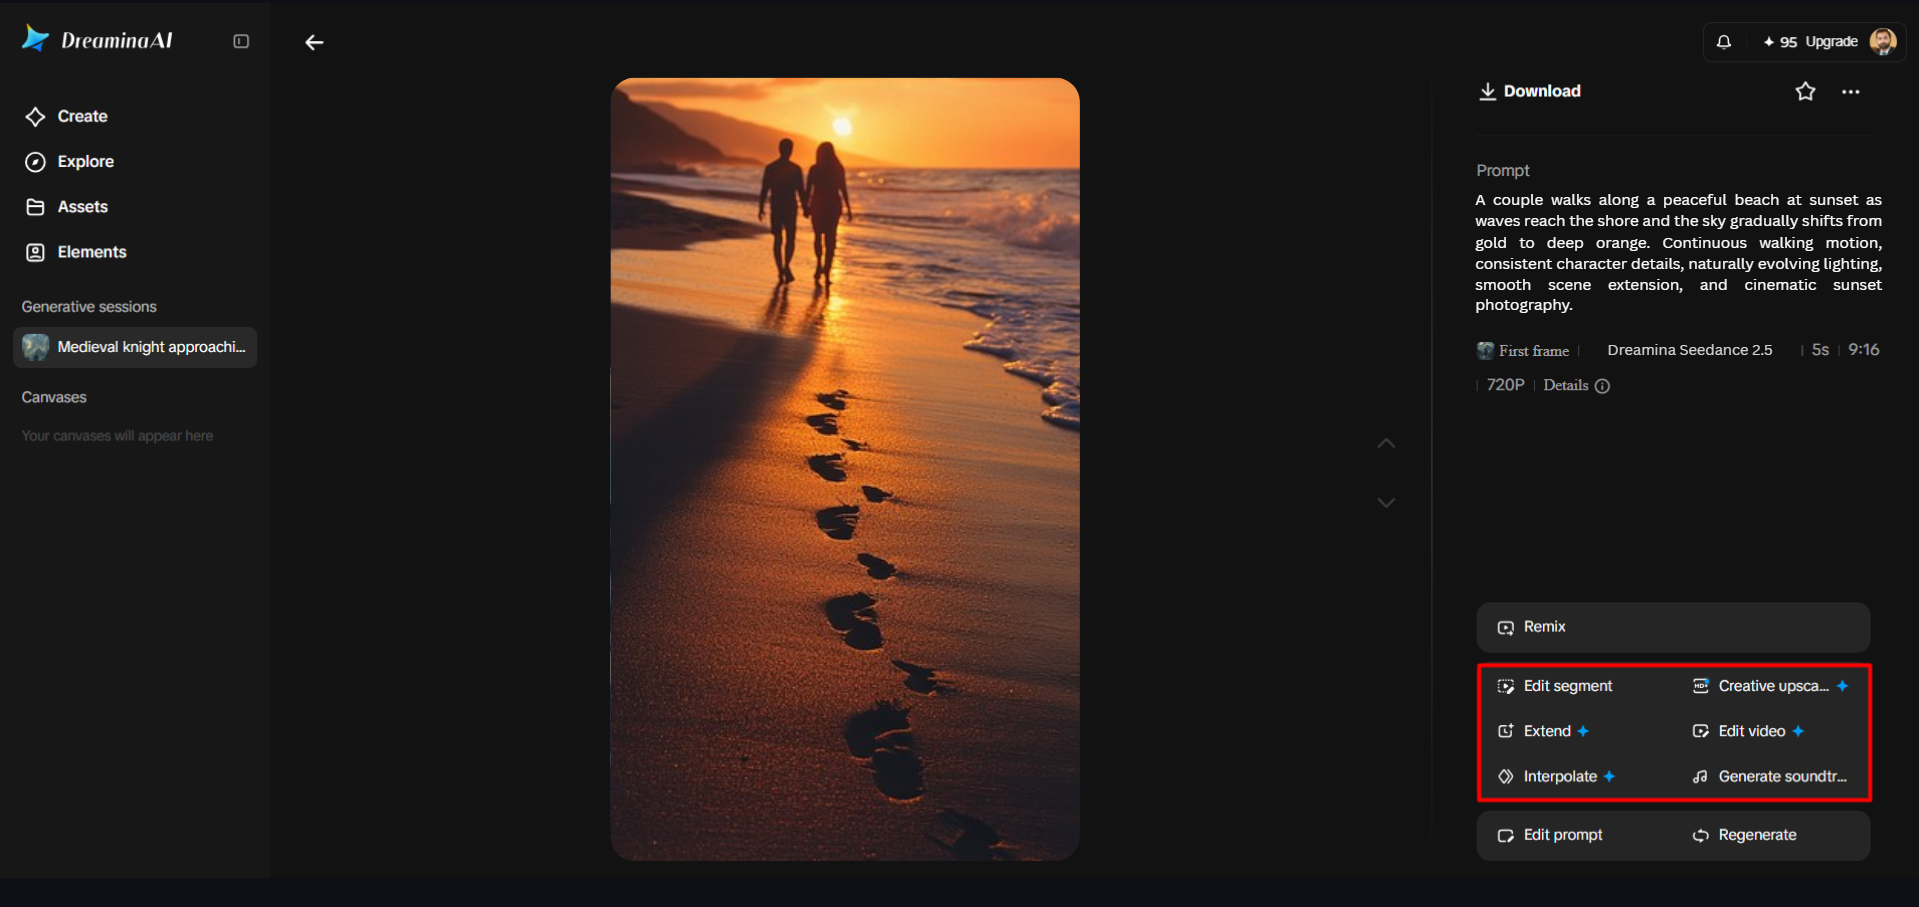
- If the first version needs improvement, select “Edit prompt” or “Regenerate” to refine the results.
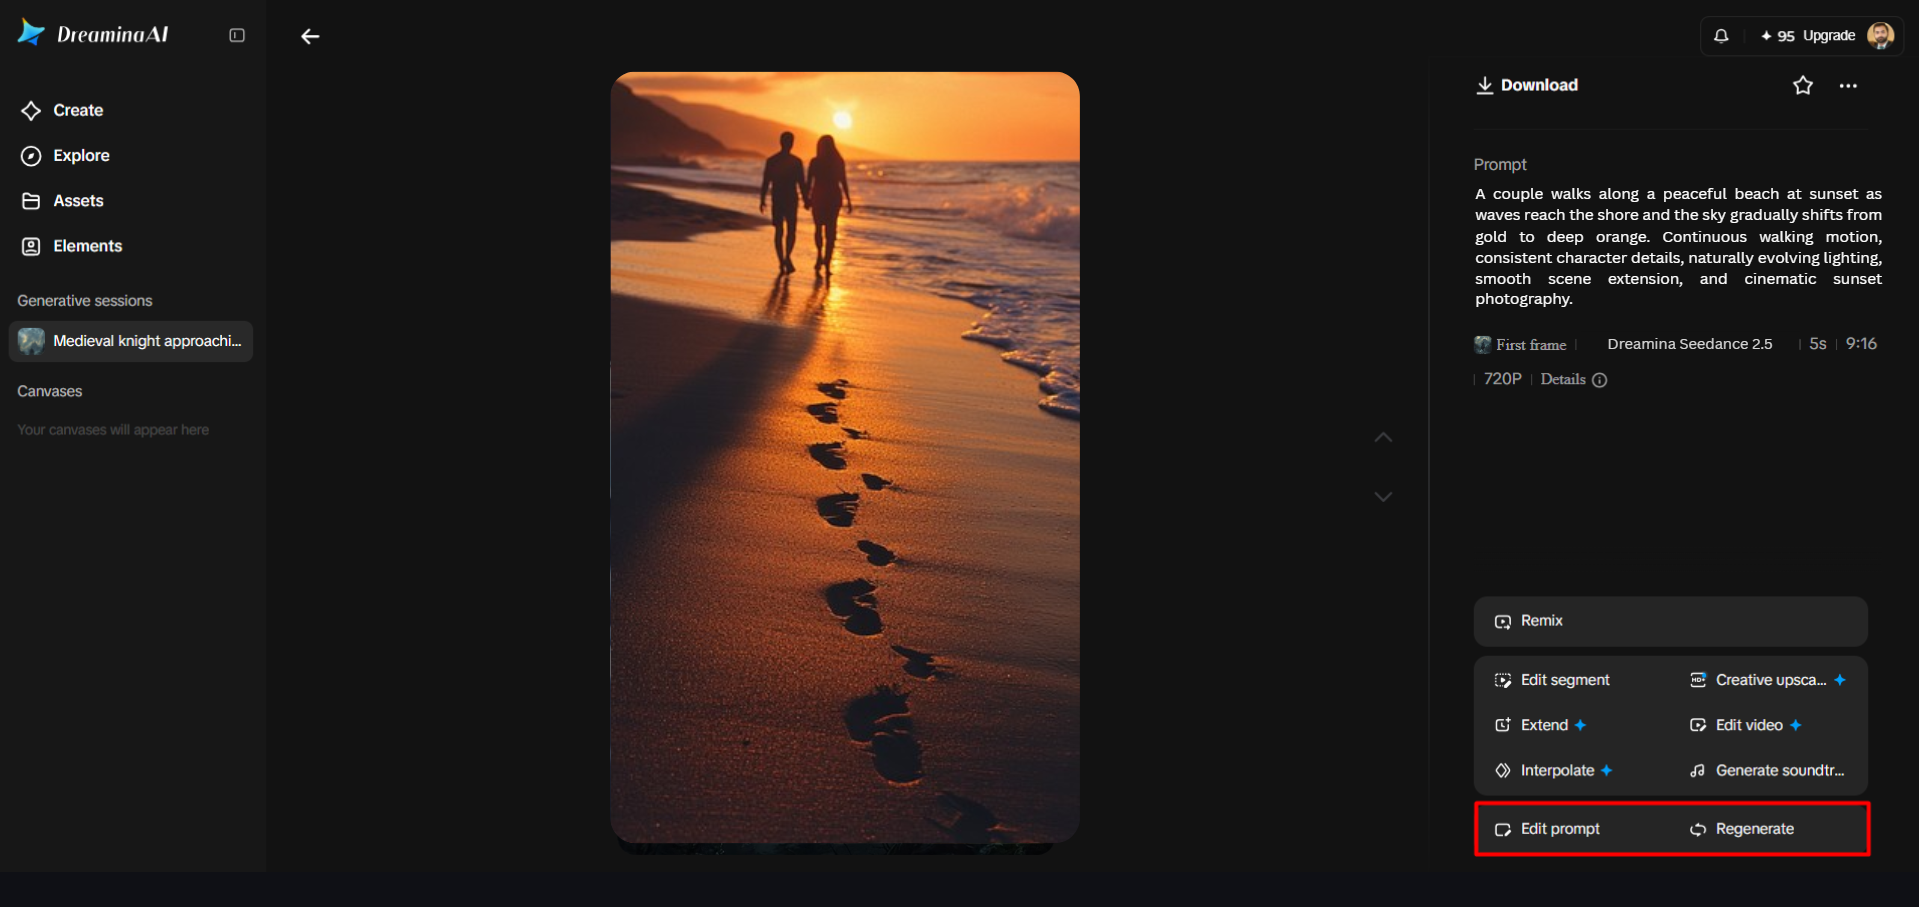
- Choose “Edit video” to make additional changes and adjust the generated footage to suit your requirements.
- Use “Edit segment” to revise a specific portion instead of changing the entire video unnecessarily.
- Select “Extend video” to continue your footage or “Creative upscale” to improve its visual quality.
- Dreamina gives you the freedom to edit, extend, and refine your video throughout the creative workflow.
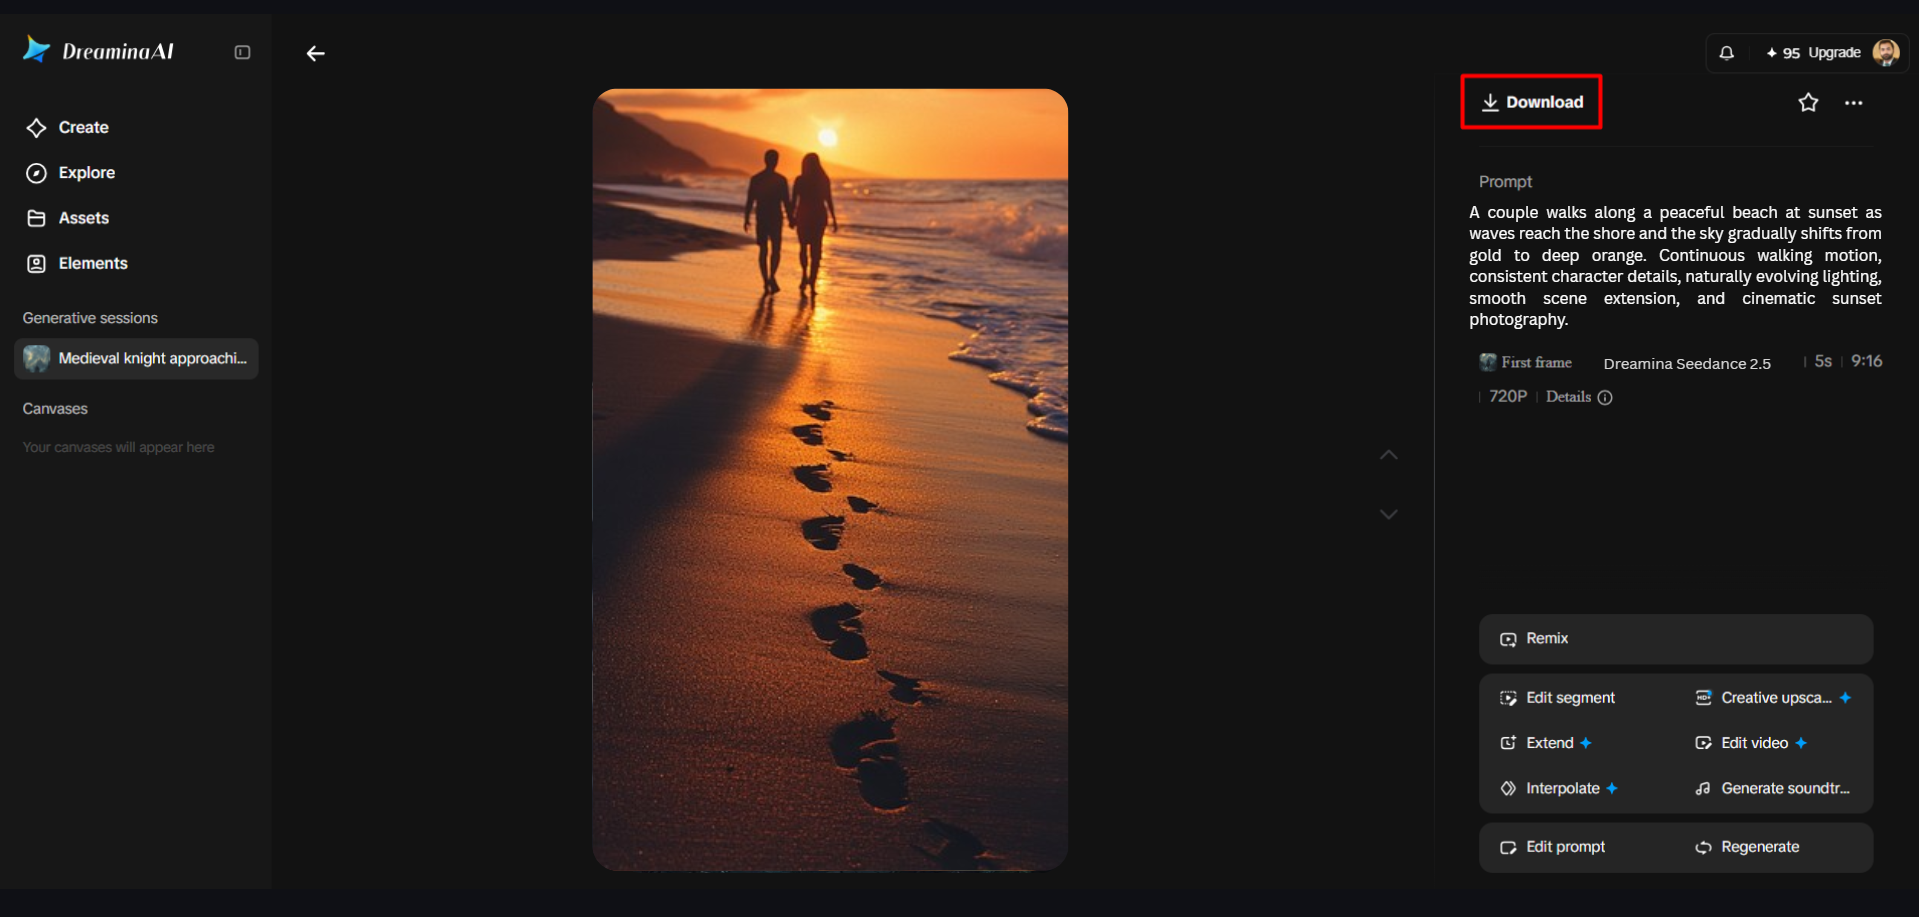
- Finally, click “Download” at the top right of the interface to save the completed video file locally.
Refine the First Generation With a Problem-Solving Framework
Check the clip thoroughly before making any alterations. Look at these areas to determine which one is the most important correction.
- Action: Ensure that the subject actually does the action that is desired.
- Composition: Is the subject visible, framed properly, and does it have a prominent visual appearance in the image?
- Motion: Look for any unnatural movements, abrupt changes, or disruptive background distractions.
- Continuity: Check facial expressions, clothes, product shapes, lighting, and surroundings.
- Ending: Decide if the ending is complete or abruptly unfinished.
Select the one big fix prior to the edit prompt or footage edit. Modifying only one instruction at a time facilitates comparison of results. In this way, it is also possible to identify improvements due to the clarity of instructions from differences among generated versions.
Decide When to Edit, Regenerate, or Make a Local Adjustment
If the creative direction requires clarification, use ‘Edit prompt’. Be more precise about the action, camera movement, or emotion. Eliminate conflicting instructions and clarify key visual information. When the overall interpretation needs to be changed, select “Regenerate”. Experiment with another direction of movement or revisit the idea of whether the source image allows for the desired action. Check against the same creative requirements with each new result. If the problem is in just one part, use “Edit segment”. Use editing controls available; check for continuity of surrounding footage. Some defects may need to be fixed in a second generation, but some rework can be reduced by targeted editing.
Extend a Clip Without Losing Its Creative Direction
If you intend to use “Extend video”, first determine what the additional footage adds to the scene. Continuing gesture, continuous camera movement, or environment change can give a clear direction. Keep lighting, subject look, framing, and atmosphere the same throughout the sequence. Check the transition thoroughly for sudden shifts in action or arrangement. Dreamina Seedance 2.5 makes use of longer-generation capabilities; as per the platform materials, single clips can be up to 30 seconds, and extended generation can be up to 180 seconds. These are actual limits, which are dependent on the models and settings available. Even longer projects may need to be cut or stitched together in another editor.
Polish the Result With Resolution Enhancement and Audio Considerations
Dreamina’s “Creative upscale” can increase the resolution if you need footage to be presented better. But the resolution enhancement won’t correct unnatural motion or magically fill in all the missing information. Check edges, textures, facial features, and fine product surfaces after processing. Where possible, Dreamina also provides audio features such as voice references and soundtrack tools. Select music that fits the pace, mood, and story of the scene. Review dialogue, music, and extraneous noises prior to distribution. Depending on the model and workflow, a variety of audio controls may be available.
Export and Verify the Finished Video
Once the video is ready, click “Download” on the top right of the interface. Open the saved file and test playback to see if it is playing properly. Look at its aspect ratio, resolution, framing, and export options. Check for any sudden jumps or unintended visual shifts at the beginning and end. Ensure captions and logos are still readable, as well as important information. Ensure that you have the appropriate permissions, usage rights, and platform requirements prior to publication. When a project needs several assembled scenes, downloading a generated clip will not substitute for additional editing.
Conclusion
There’s a reliable workflow from image preparation to image generation to image review to image refinement to image extension to image enhancement to image export. Throughout this process, Dreamina AI offers controls to tackle various creative and technical needs. Don’t change instructions or re-generate footage until you’ve identified the real problem. Each editing decision can help the final video achieve its purpose, with deliberate revisions and careful verification.